Auf gehts VfL Bochum – Part 5: Meeting the midfield – The wide men

vflbochum

Not every team needs a player capable of pulling all the strings – indeed, sometimes it’s better to have capable playmakers all over the park. But to win games you need to score goals, so at some point you start to rely on your players’ brains and feet to fashion chances, be it from a moment of magic or an overall plan coming to fruition. The best strategies normally contain a good blend of both with a well thought out structure/platform that allows certain players to provide the ingenuity needed to beat the opposition defence.

With my decision to mitigate my chosen formation’s weakness by locking down the centre, the vision was to create a relatively consistent platform that allows the two wide men to be a bit more loose in their role. I’m not letting them off the leash altogether, but the Wide Playmaker on the right will Roam From Position whereas his counterpart on the left will be given an attack duty to encourage him to take more risks, be this on the ball by trying riskier passes or off the ball by moving into more advanced positions. We’ll start this section of squad analysis by looking at the candidates for the playmaker role: Continue reading

Auf gehts VfL Bochum – Part 4: Meeting the midfield – The central pairing

vflbochum

The Midfield. Das Mittelfeld. That crucial area of the pitch that is simultaneously a creative hub and a defensive screen; where passing patterns are woven and opposition attacks destroyed. Usually containing players with talents varied like the instruments of an orchestra, they can be tuned to sound as bombastic as an Italian opera, as balanced as a Viennese waltz or as playful as Brazillian samba. As the cliché tells us – it can be where the game is won and lost. Lucky then that the incumbent VfL Bochum manager built quite a varied midfield for me to work with, combining steely defensive players in the centre with lightweight but creative attackers out wide. In this article, I’ll be looking at the central area of midfield where a trio of very capable players should give me the central lock-down that my tactic depends upon. Let’s take a look at the contenders…
Continue reading

Auf gehts VfL Bochum – Part 3: Meeting the defence


vflbochum
There’s nothing quite like that palpable atmosphere in a football stadium – with its tension, mumbles and an energy you can almost taste. My first few times in the Ruhrstadion (AKA rewirpowerSTADION for sponsorship reasons… *grumble grumble modern football grumble*) I was transfixed by the tifo displays, the sea of flags, the constant drumming, the megaphones and the almost other-worldly tunes they sang. Perhaps not as tempestuous as Italy or South America, from my perspective the German fan culture still has an edge that seems to have long left the UK. It doesn’t feel dangerous, it feels alive. And they chant and chant and drum and hiss and cajole and chant some more. The Bochum fans in particular have some great catchy chants and one of them is responsible for the naming of this series of articles.
Continue reading

The Stoke Chronicles: Tactical Analysis (Part 1)

I’m heading into unprecedented ground here folks. I can’t remember ever churning out articles so regularly as this, it’s a good thing, a bloody good thing. I’m enjoying it and hopefully you are too – long may this continue.

As promised I wanted to provide a bit of in-match tactical analysis to back up my last article where I broke down my team, tactic and instructions. So prepare yourself for death by screenshot.

Here I’ve looked at 2 matches from the 2021/22 season, one of the seasons with a Premier League & Champions League victory. I wanted to analyse matches before this season – but only realised when writing this article that I couldn’t go back further than 4 seasons! Slightly gutting, but a lesson learned. You’ll go on to see that I’ve analysed goals from these 2 games – as this is the easiest thing to do. In future posts I will focus on defence and weaknesses to try and give a really rounded look on this Stoke team.

Champions League Final: Stoke 3-1 Chelsea

I’ve picked this game because it was lovely to revisit, always savor a win over Chelsea, especially with Mourinho still there. We won the game comfortably in the end, 2 goals from set pieces and the first goal I’ve analysed below.

I enjoy scoring this type of goal and it’s one that’s pretty commonly scored in this Stoke side. It’s fairly simple and direct and takes full advantage of the demonic pace in our wide players. Rene-Adelaide’s starting position between the lines is exactly what we want for him to either turn and run at the defence or to have time to pick a pass – which he does very well.

Champions League Semi-Final 2nd Leg – Stoke 4-0 Dortmund

Now for a lot more insight. Here I’m analysing all 4 goals and will hopefully give you a good idea of how my tactic and instructions contribute to the build-up and more importantly, the goals we score. Buckle up and get ready for a thrilling ride.

Stoke 1-0 Dortmund (Gabigol 4′)

Another deadly counter-attacking goal. Against a 4-3-3 we are lethal on the break as more often that not, the AMR/AML are caught high up the pitch and leave acres of space down the flanks as the DR/DL tuck inside. I particularly enjoy how Jevdjovic is within the penalty area when crossing and not nearer the corner flag, meaning we’ve a much higher % chance of finding the man in the middle and ultimately, scoring.

Stoke 2-0 Dortmund (Cresswell 29′)

This is a great example of how the instruction to ask my full backs to sit narrow can have a positive affect in attack. Notice how we have 5 players in their penalty box and a further 3 supporting. If an attack breaks down we may be a little exposed, so it’s a good job we have a good habit of scoring.

Stoke 3-0 Dortmund (Gabigol 51′)

A lovely goal and an example of how our players can find space both through the initial set up positionally and from their own ability. The triangle between Romero, Rene-Adelaide & Gabigol works very well again.

Stoke 4-0 Dortmund (Gabigol 79′ – hat-trick)

A fairly straight forward goal but one that comes about through a number of factors. Cresswell starting wide means Sane tucks in, allowing him to break into the box when he skins his man, making the ball to Gabigol a simple pass instead of a low % cross.

I hope this gives you all a bit of an insight into how the tactic works in practice. There’s a lot more to show – but only so much I can do in one post. All feedback appreciated as ever. My next blog will profile a few key players in our current squad, until then!

Auf gehts VfL Bochum – Part 1: The groundwork

vflbochum

After a protracted reorganising of my life forced me into a several month article hiatus, I felt it was time to jump back on the wagon, dust off my virtual boots and start asking my scouts to find me the next Jamie Vardy. So far FM16 has mostly been about tactics, tweaking and a new level of deeper learning for me, though like many of us I’m still prone to the occasional freak out of frustration when something just isn’t going as planned. To be honest, my most recent Altrincham save was binned when I took a few weeks off, came back and had no desire left to raise the sleeping Chesire giants to the pinnacle of English football, especially as it was something I’d done before. I needed a spark of inspiration… Continue reading

The Stoke Chronicles – Tactics – The 4-4-1-1

So I now sit here in the summer of 2024, in my first installment I caught you all up on the brief history of my time at Stoke. Since then the 2023/24 season has ended and Stoke have gone on to retain their Premier League title for the 5th consecutive season (gutted there was no Steam achievement) & also stormed back to win the Champions League after a 4-3 win over Arsenal (who I also pipped to the title by 3 points). All in all, the Stoke train keeps on rolling.

A big reason for our success is our 4-4-1-1 system that I’ll delve into in this piece. I’ll firstly say a big thanks to Jonathan Aspey (@JLAspey) as it was after his success at Newcastle with his 4-4-1-1 that formed the foundations of Stoke’s success.

So let’s look at the basic structure of the system, instructions & then plenty of in-game analysis will follow over the coming weeks.

Formation

A pretty straight forward set-up. The idea behind my system is to dominate the flanks whilst having plenty of support in the box to aim at. Coupled with my instructions I want to be incredible on the counter attack, press high, have good and meaningful possession (not possession for possessions sake) and most importantly – clinical. Let’s summarise how I expect each role to play out:-

– Goalkeeper – Set to the default setting – all I’ve asked is for him to distribute to our full backs; this way I hope to utilise the wings as early as possible whilst also opening up vertical passing alleys to the central midfielders.
– Full Backs – Fewer Risky Passes & Sit Narrower, the passes instructions speaks for itself, I don’t want him to be wasteful in possession or look to play too long & direct. Sitting narrower may seem a little ambiguous but it’s effective; in defence he will not so easily allow a wide man to cut inside and shoot or play a through ball, in attack he dovetails well with the W/WM – often starting in a different, more narrow channel than the winger allowing him to underlap, provide a passing option AND overlap where the winger is either forced or dribbles inside.
– Central Defenders – no frills, no spills, be solid defenders, keep it simple, break up attacks, mark the forwards etc…in practice if I can also have centre backs who are confident on the ball and can distribute well – then fantastic. Otherwise, just play it simple to those who can do it better.
– Right Midfielder – a lot of people will ask why this chap isn’t set to a winger, the main man I use there (Jevdjovic) is a perfect winger, not necessarily a wide midfielder. The answer is, mostly, balance. I find his starting/defensive positions are far better, he will occasionally sit narrow allowing the wing back to support, however I also want him to be a winger so I also require him to Shoot Less Often (not unnecessary shots from stupid angles, ideally!) , Dribble More, Roam From Position & Cross From Byline – and boy, there aren’t many better than Jevdjovic at crossing from the byline.
– CM-D – the midfield needs balance and can’t be too gung-ho – this chap is there to shore things up in transition but also be a key cog in our build-up play, always offering a passing outlet when possession needs recycling from side-to-side, something we do extremely well.
– BBM-S – arguably the most important player in the team. He needs to support both in attack and defence, so just has to be a fantastic all round player. Lucas Romero made this position his own.
– Left Wing – other than also asking him to Shoot Less Often (wide men do it far too much), all I want this player to do is give the opposition full back absolute hell. Raid that wing, get the ball in the box and also support attacks from the opposite wing.
– Trequartista (AMCR) – this position is lob-sided to the right to allow the BBM to break into free space ahead of him and also allow the striker to drop off without the AM-strata becoming congested. I want this player to always provide a passing option between the lines, look to play in the striker and also be someone who can score plenty of goals himself when presented with the opportunity.
– Striker – get me goals, goals, goals. Get on the end of all those crosses and be the one to take all the glory. I want this player to be quick, able to beat a man & most importantly, clinical. He’s also the first line of defence and a high work rate to close down the defence and block passing channels, forcing them to play long is key in allowing us to strangle possession.

Instructions

As you can see, setting player roles shouldn’t just be something you do idly, each should have their place within the tactic as a whole – just like the instructions above.

– Mentality – Control – I want to be concise in possession and also look to dominate weaker teams, we’ll take slightly more risks and the full backs will often look to overlap. I know that we will be susceptible to counter attacks – but the goal is for my attacks not to break down and result in a goal 🙂
Team Shape – Very Fluid – this will allow my players to break out of a strict 4-4-1-1 setup to press the ball, close down channels whilst also roaming from their position to provide passing angles & allow for high creativity in our passing. It also ensures all of my team contribute to defending. Winning the ball back as quickly as we can is important to me.
– Shorter Passing – don’t hoof it long boys, be visionary, make good decisions and build the attack concisely
– Pass Into Space – I like to think that this instruction coupled with my other ones means that we’ll only do this when the pass into space is our best option and not just an aimless hoof into space.
– Play Out of Defence – again, shorter passing is encouraged, I don’t (usually) use a target man so long balls aren’t going to be successful
– Exploit the Flanks – we want to utilise our wide men and whip those crosses in, over and over again
– Much Higher Defensive Line – encouraging our high press and forcing more of the play into the oppositions half of the pitch
– Close Down Much More – press players, close down channels, win the ball back as soon as possible
– Prevent Short GK Distribution – another instruction that encourages the opposition to play long and preventing build-up play. I’d be much more happier with their GK lumping it onto the heads of my defenders then moving my players out of position with short build-up play

Opposition Instructions

Often overlooked but bloody important. As if telling my team to press & close down more wasn’t enough – I’m reminding them again. I want my defenders not to let their attackers out of their sight. I always want to close down their ball players and if I can force their full backs and wide midfielders inside then I can congest the pitch and hopefully turnover possession. I will also look at the opposition and ensure that strikers are shown onto their weaker foot. With players in the opposition AMC strata I will look at their system and see if they play wingers or inside fowards, it’s important to discover this as you may want to force inside fowards wide & wingers inside – and this can change from player to play, tactic to tactic, team to team.

I hope you’re still with me and have found the above insight interesting – and I know what you’re thinking – you want to see how this all works in practice. Well, conscious of my word count and the fact only half of you may have read this far, never fear – that’s coming next. Some key match analysis will follow next week where we’ll see how the instructions and player roles come to life on the pitch and all contribute to our success.

Until then!


The Stoke Chronicles: A Brief Story So Far

As many of you (hopefully) reading this you’ll know that for a fair while now I have been progressing extremely well with a Stoke save on Football Manager 2016. We’ve had our ups and downs, but it’s now definitely one of the best and most enjoyable saves I had in any version of the game.

I’ve been playing a lot, we’re into the 2022/23 season which, for me, is some damn good commitment to a save. I’m usually hopefully jumping from one to another, I get itchy feet – but I’ve found my slippers at the Britannia Stadium.

With all this in mind I’ve decided it’s about time I share my Stoke saga with anyone who will listen. In a series of blog posts I hope to give you an insight into the brave new world in the city of Stoke, the club, the players, my tactics, results and everything in between. Hopefully you’ll then all see a bit more into my FM mind and who knows, maybe even come to like Stoke a bit more than you do now. Forgive me for the lack of detail, but I will be revisiting past players & matches for you in future posts 🙂

So without further ado, let’s crack on.

The Story So Far

I sit here today on February 25th 2023 and things are looking quite rosy, but it wasn’t always this way you know. I’ve worked bloody hard to get where I am today, you don’t get paid £40k for nothing…come to think of it I really should be getting paid more – but I digress.

Me

So this is me. A not too shabby looking manager wouldn’t you say? Other than my apparent complete disregard for domestic players (which is kind of true), 4 personal trophies but more importantly, 16 trophies with Stoke over the last 7 seasons.

Trophies

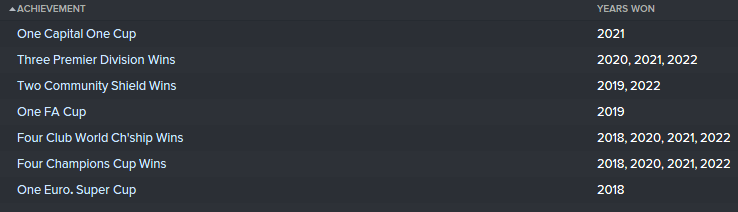
Since 2020 there really has been no better team in Europe that Stoke – winning the Premier League and Champions League for 3 seasons running and 4 times overall since 2018. It’s been such an enjoyable trophy haul with some cracking matches and hopefully I can give you an insight into the reasons for my success both tactically and individually.

2015/16

It wasn’t all plain sailing though…we finished 12th in our first season on 50 points, OK it wasn’t plain sailing for the first season but we’ve achieved over the odds pretty much from there on in. As much as we struggled in the first season I was able to make a number of transfers that would help change the face of Stoke;

– Felipe Gutierrez (FC Twente) £3.9m
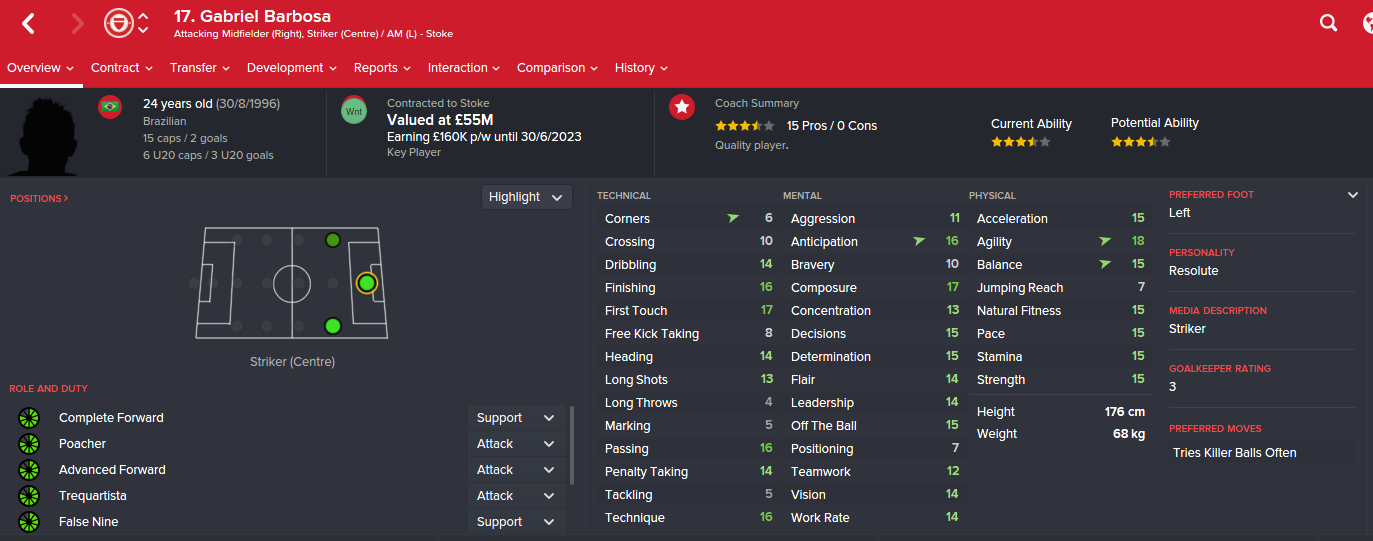
– Gabriel Barbosa (Santos) £9.5m
– Andrija Zivkovic (Partizan) £950k
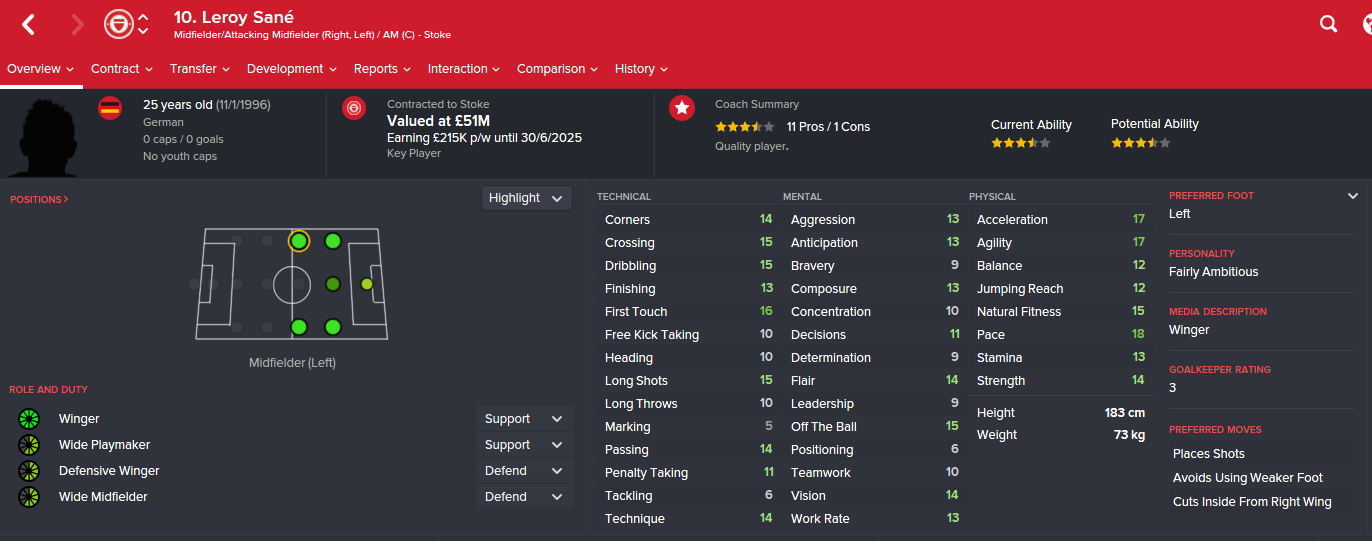
– Leroy Sane (Schalke) £13.75m
– Robin Knoche (Wolfsburg) £1.7m
– Lucas Romero (Velez) £950k

The first 3 were bought in the summer, the latter 3 in January, alas they weren’t enough to make an instant impact, but all were big improvements and went on to have fantastic careers with us. As we moved into…

2016/17

…we made these transfer;

– Geronimo Rulli (Sociedad) Free
– Emanuel Mammana (River) £7.5m
– Simone Zaza (Juventus) £15m
– Hirving Lozano (Pachuca) £12.5m
– Aaron Cresswell (West Ham) £10m
– Mayke (Cruziero) £7.5m
– Matias Kranevitter (Valencia) £24.5m
– Andrija Balic (Hajduk) £7.75m
– Matthew Targett (Southampton) £5m

These incomings were aided by the sale of Shaqiri to Utd for £40m, someone who I was reluctant to let go at the time, but he moaned, he wanted to leave and I rarely keep someone against their will. All of the transfers above went on to make a huge difference, with 4 of them still at the club with me now 7 years on.

Our second season is where we really started to assert ourselves as a top Premier League side, finishing 3rd (joint 2nd) with a record high 78 points, 10 off eventual runaway winners Arsenal.

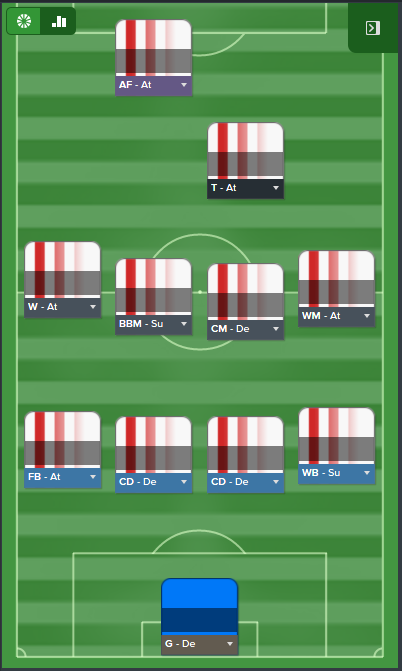
In my next post I will delve deeply into my current tactic – but even in my second season, despite my success, I still wasn’t happy at the time with the system, we drew too many games (12) and I couldn’t get the two central midfielders to harmonise in a symmetrical 4-4-1-1. With the help of loanees Serge Gnabry & Rodrigo De Paul we ensured Champions League qualification outright. Rulli, Knoche, Juan Jesus & Barbosa were fantastic but it was Leroy Sané who stood head and shoulders above the rest averaging 7.90 and clocking 13 goals & 12 assists in 29 games. He quickly became a fan favourite and also won a special place in my heart as he tore right backs to pieces.

2017/18

The Champions League was coming to the Britannia Stadium, would Lionel Messi be able to do it on a cold night in Stoke? Maybe we were going to find out.

A frustrating Hirving Lozano was sold to Watford for £35m, in truth he needs to play as an IF from the right hand side but I was stubborn and wanted a Winger in that role at MR – he wasn’t going to dislodge Sané in the ML position, he did quite well at MR but his incessant need to cut inside was a detriment to our play at times.
Out went Juan Jesus too, for a cracking £33.5m to Wolfsburg, he had a fantastic season with me but I had 2 left footed defenders at DC and he wasn’t getting any younger – I just couldn’t turn that sort of money down. It also allowed me to do the following business:

– Alex Teixeira (Shakhtar) £17.5m
– Rodrigo Bentancur (Boca) £7.25m
– Lucas Moura (PSG) £10m
– Filip Lesniak (Legia) £5.75m  –  Regen
– Roberto Firmino (Liverpool) £25.5m

Teixeira & Firmino were still fantastic players, unhappy at their clubs and available at good prices, with De Paul heading back to Valencia they would rotate in the AMC position. Moura would replace Lozano at MR, Lesniak was a cracking looking young DC & Bentancur is a potential world class midfielder able to play anywhere across midfield.

This season turned out to be quite special.

17-18 CL run

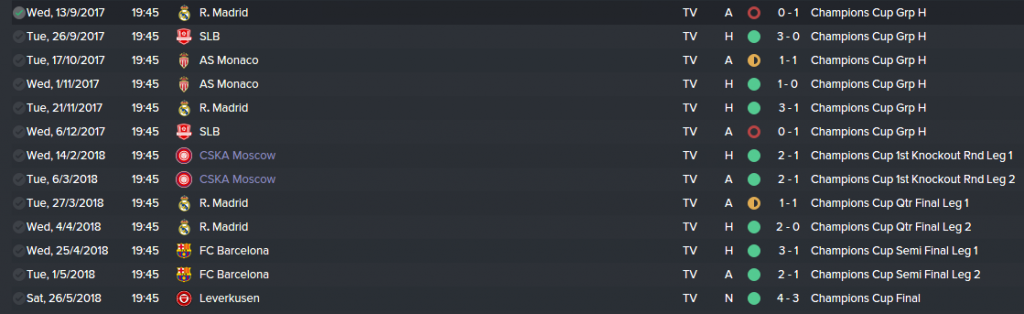
Initially I was happy to progress through such a group, but nothing could prepare me for the run we then went on to lift the trophy at our first attempt, the two wins against Barcelona were just…amazing, and I’ll be sure to analyse these games for you in the coming weeks. The final was then so special; 1-0 down, 2-1 down, 3-2 down and then a last minute winner from Teixeira sealed an incredible win.

It was a run that, at the time, kept me going with the save, our league form was incredibly inconsistent and we struggled with the hectic schedule and ended up finishing 6th – but they didn’t bloody matter did it?! Champions League secured for a second season and what a way to do it. It was at the back end of this season that I finally settled on my current lob-sided 4-4-1-1 system. This was also the season I discovered how good Jeff Rene-Adelaide was after a cracking loan spell with me averaging 7.50.

2018/19

How could Stoke improve after winning the Champions League? Well I still had the desire to win the Premier League and now I’d gotten to grips with my 4-4-1-1 I was far more optimistic of a stronger domestic campaign. It was another busy summer…
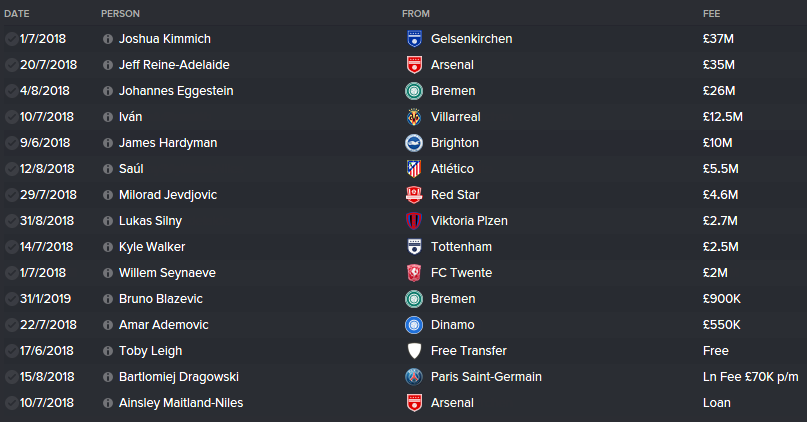
Ins

18-19 Ins

Outs18-19 Out

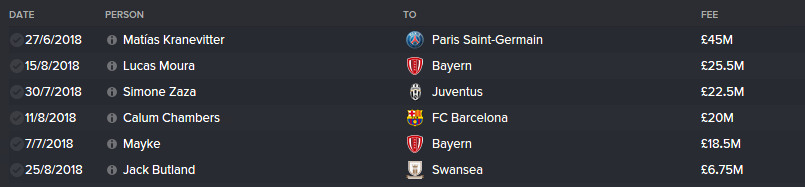
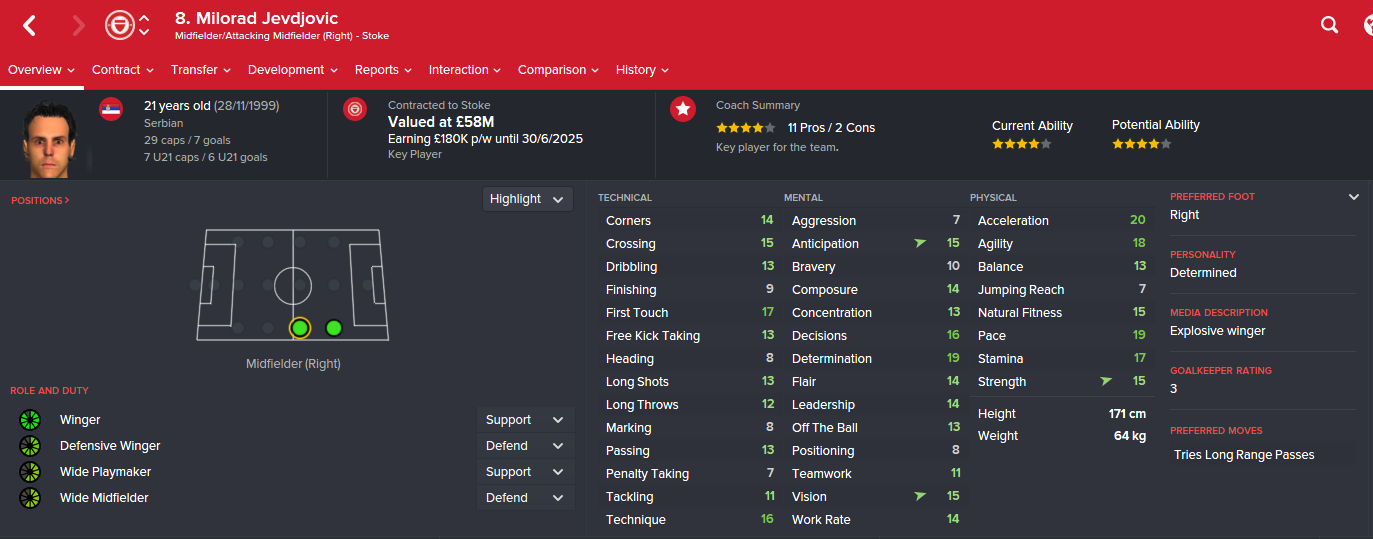
Kranevitter never quite performed as I’d hoped so when PSG came in with a big fat offer, I lined up Kimmich and cashed in. Moura & Zaza weren’t happy with their lack of football so were sold. Chambers was an annoying one, I really didn’t want to sell but he moaned so bloody much. His story with Stoke wasn’t over though. Kyle Walker came in for a complete steal given what he went on to achieve with us, and this was the season we welcome Milorad Jevdjovic to the club. You’ll hear a lot more on him. A lot more.

But how did we do in competition this season? Frustrating that’s how. We bowed out of the Champions League at the hands of Bayern in the Quarter finals 4-1 on aggregate and came runner-up to (bloody) Chelsea in the league, finishing on 77 points and 6 behind Chelsea. Again draws were our downfall as we drew 11 games, there were small improvements to be made and I was keen to find them, the title would be ours. Our team was starting to click with my wide men performing fantastically, Gabriel Barbosa getting 41 goals in 48 and Lucas Romero was becoming the ultimate box-to-box midfielder.

2019/20 – 2021/22

Three seasons, three titles, pipping Chelsea to the post on all three occasions made them all the more sweeter. 86 points, 91 points & 92 points and we had converted the frustrating draws into wins and the steady process of buying numerous wonderkids and regens was reaping dividends alongside the 4-4-1-1.

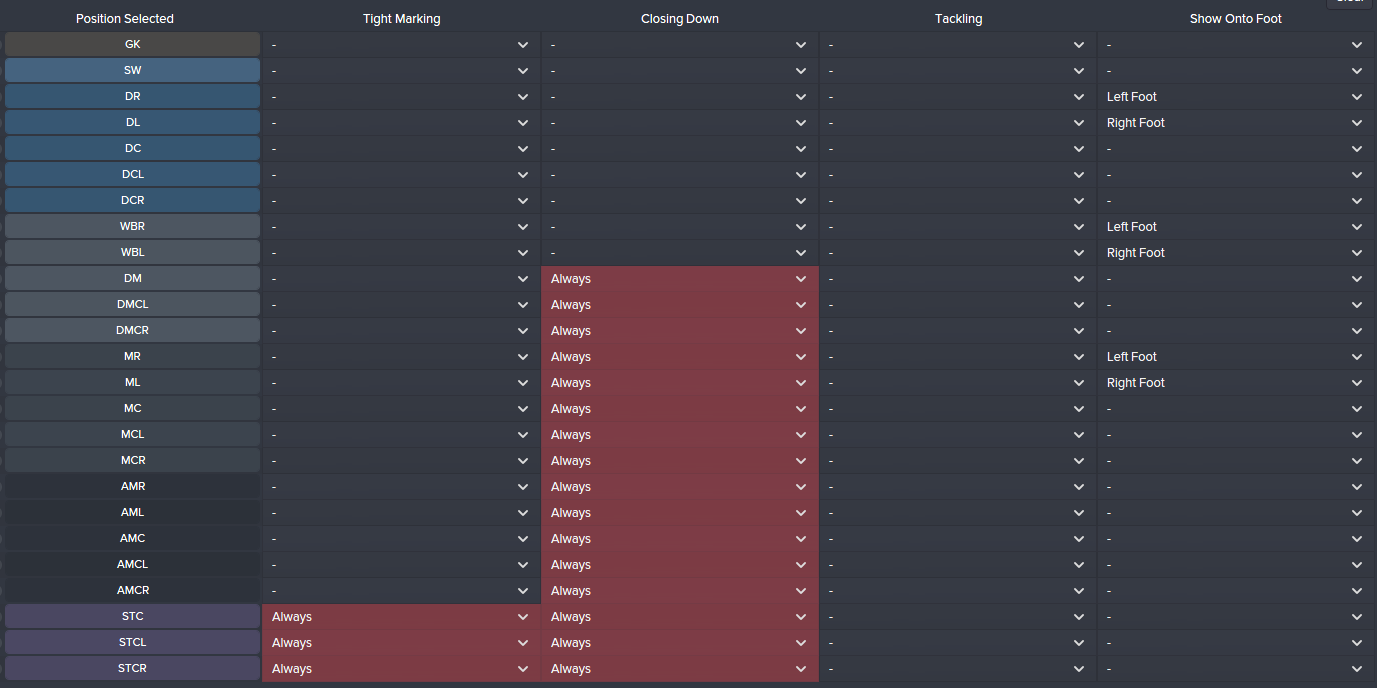
It didn’t end there, each of these 3 seasons also saw 3 Champions League titles added to the bag, making it 4 in the last 5 seasons. We have established ourselves as the best team in Europe through extreme pace down the widths, incessant pressing and some fantastic, intricate build-up.

2019 saw the birth of a star and a key cog in the Stoke machine – Milorad Jevdjovic. After a fruitful loan spell in his first season with me at Sporting Lisbon as an 18 year old – he progressed very quickly and I could do nothing other than start him the following season. Let’s just say his article will be the longest and the most enjoyable to watch and read.

Thanks for sticking with me here, I hope this quickly summarises how I’ve got to where I am today, please rest assured I will be jumping back to plenty of the key moments throughout this save and going into a lot more detail on the tactic, matches and the players.

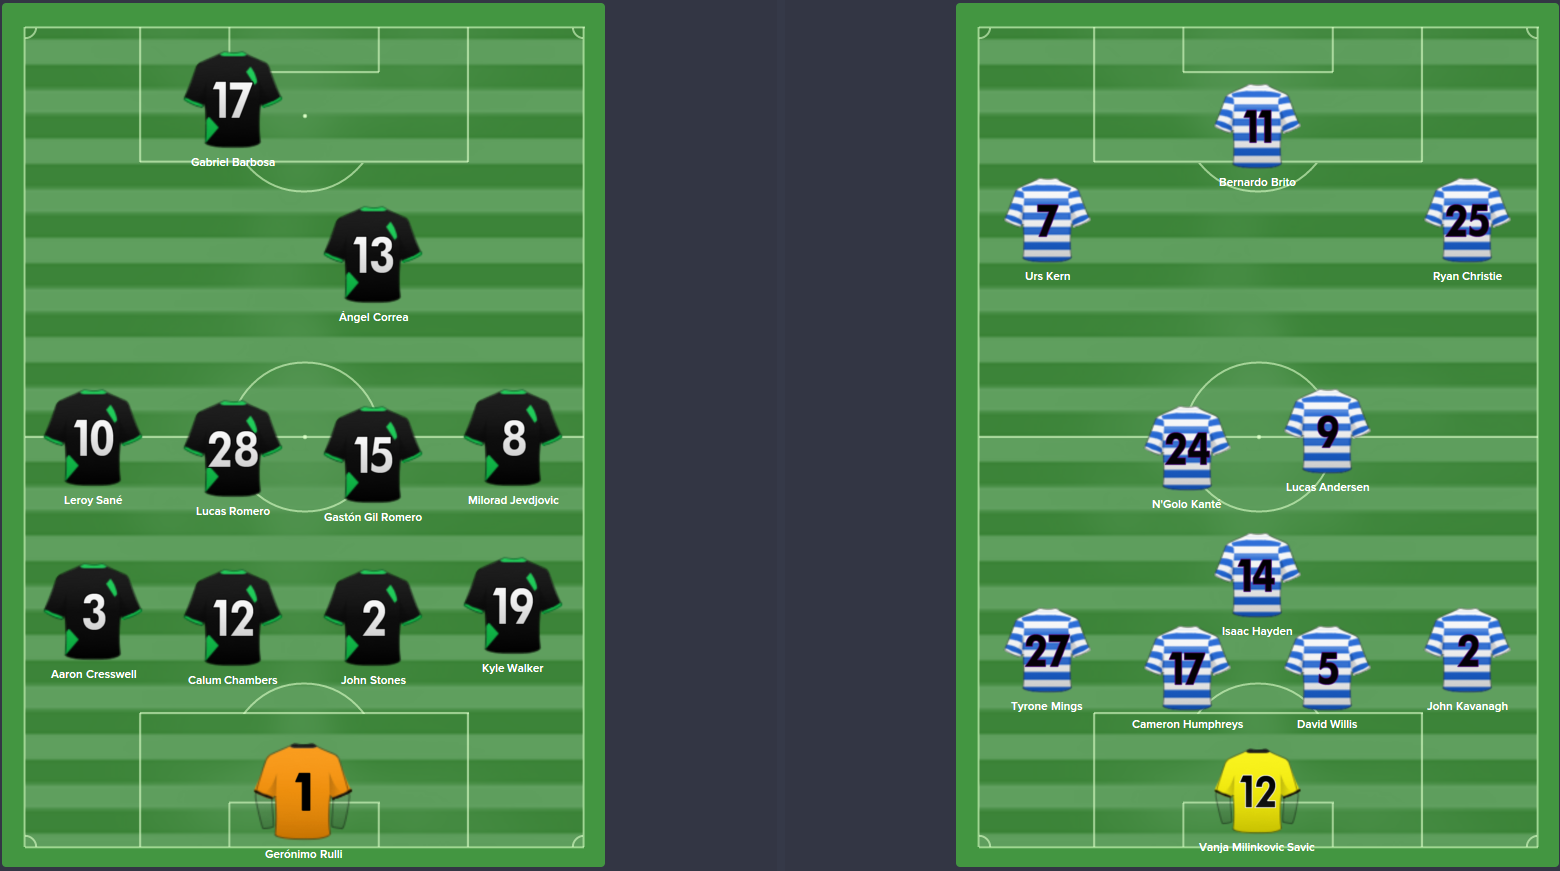
Until next time where I’ll be drilling down into the successful 4-4-1-1.


The Versus Series – Ed’s Stoke take on Chris’ (FM_Samo) Morton

FM Versus Competition – Ed v Chris

Stoke vs Morton

Welcome to a brand new feature some of us within the FM blogging world are looking to bring to you over the coming weeks and months where we pit ourselves, our teams, tactics & pride against each other in a one off, winner-takes-all-the-bragging-rights match.

However this competition is different in that it’s not the result that matters the most…ok it still matters – but what we’re looking to mainly provide is a bit of an insight into our thought process as FM managers as well as a rundown on our team, tactic and in-match analysis when standing on the touchline with each other. So without further ado, let’s stop Ed from waffling on. When you’re done reading this make sure you check out Chris’ take on this game here.

So to kick things off I’m up against Chris Samson (FM_Samo) and his overachieving Morton side. To set the scene my Stoke side have, for the most part, been laying to waste most of the PL & Europe for a few seasons now, so the match-up is slightly skewed, however as mentioned before, it’s more about the journey than the destination (big hint: I won the match, go Stoke!).

So here’s how the teams looked before kick-off:

FMV - lineups

So as you can see I’m in my beloved, slightly lob-sided 4-4-1-1 formation & Chris has gone for a 4-1-2-2-1 / 4-3-3 formation. On seeing Chris’ formation before the kick-off I didn’t make any changes, I know that my team has fared fairly well against this system in the past with the only real threat coming on the counter attack if my full backs have bombed on too bloody far and we for some reason don’t put the ball in the back of the net. Yet I know that Chris had more to worry about that I did (that sounds awful but really no offense is meant Chris). Mind games ey?

And here’s my instructions:

stokeinstr

Stoke’s key men:

Keyman - Jevdjovic

This is the main man right now. My best player and a bloody awesome regen. He dominates the right flank with his pace and power. I play him as a WM-A which may surprise some who would no doubt look at him and cry out that he should be a winger, but hopefully all will be revealed later. He also does a damn good job if getting on the end of left wing crosses from…

Keyman - Sane

This chap, my first love (not strictly true) and you’d be hard pushed to find two better wide players. Sane is the source of most of my assists because he’s bloody brilliant at whipping in them crosses. Most of them to…

Keyman - Barbosa

Gabriel Barbosa, Gabigol, Sexy Beast – he goes by many names & he’s nothing short of fantastic playing as an AF-A up top for Stoke. Morton, you have been warned.

Stoke 1-0 Morton (Barbosa – 9mins)

1st goal initial

So here we are in the build-up to our first goal, Chambers has played the ball into Lucas Romero. You can see how Morton are set up with quite a structured 4-3-3 and quite narrow sitting full backs and inside forwards. My 4-4-1-1 becomes a 4-4-2 here with both wide men sticking very wide and stretching the pitch. The three danger men are circled, all of which are available to Romero who has a plethora of passing options. The filled boxes also demonstrate just how much space Sane & Jevdjovic have should they receive the ball.

Romero decides to switch it out to the danger man; Jevdjovic (as we look to exploit the flanks).

1st goal 2nd

Jevdjovic takes one touch to control it and then his 2nd touch is shown above, lightning turn of pace and he’s beaten his man with ease with acres of space to run into. Romero (circled in white) who played the pass has already bombed past his man to provide support in the attack.

1st goal 3rd

Jevdjovic actually slowed up to allow the defence to get back at him, but he was just toying with them as he gets to the byline and whips in a beauty to the near post as Gabriel Barbosa heads in ahead of his marker. 1-0.

Stoke 1-1 Morton (Kyle Walker O.G – 38mins)

It wasn’t all plain sailing after this as Morton grabbed an unlikely equaliser after 38 minutes through a Kyle Walker own goal.

morton goal 1st

Their deep lying forward picked the ball up between the lines and plays it square to an advancing central midfield player in Kern, instantly I can see I’m in trouble as Walker goes to press the ball due to my instructions to close down like f*cking crazy. Jevdjovic is fantastic but he’s not completely enamoured with the idea of tracking the full back here and he has oh so much space to run into.

morton goal 2nd

Mings is let loose down the touchline and he fires a cross into the near post, as you can see Walker has done his best to get back into the box to defend but right now he’s not even looking at the ball…and doesn’t look at it once as it cannons off his knee from the edge of the 6 yard box and into the bottom corner past the despairing Rulli. You can argue I was slightly unlucky with the nature of the goal however I was caught out by clever overlapping by Mings and also a victim of my own philosophy to press the ball extremely meaning Walker was caught out.

Stoke 2-1 (Barbosa – 58mins)

3rd goal 1st

A rather fortuitous, if not well deserved lead came about from a throw-in deep in Morton’s half. Chris will no doubt be annoyed at his team’s desire not to clear the ball as it ultimately ricocheted into Barbosa’s path who lashes a volley into the far corner to give Stoke the lead.

Stoke 3-1 (Barbosa – 68mins Hat-trick)

4th goal

Not a lot to analyse with this goal either, after a lot of pressure by Stoke on the Morton goal Chris will again be extremely annoyed with the marking at this corner. A simple cross to the 6 yard box and Barbosa is unchallenged as he heads into the top corner to settle the tie and bag a hat-trick too.

Summary

As a side note I’ll be showing more of Stoke’s tactical shape and build-up play in a separate blog post in the near future (honestly), but this was a game where we were helped by Barbosa’s clinical finishing as well as some abject defending. We didn’t create a hell of a lot as the stats show:

summary stats

We had the lion’s share of possession though as you can see we don’t complete many more passes than the opposition; I’m ok with this as I play quite a high risk style of football with the aim of getting the balls quickly to the wide men and letting them attack their man or work the ball around the box till we find an opening. Only two clear cut chances were created and neither of them resulted in a goal funnily enough, with Angel Correa thwarted by the keeper from a corner and Barbosa somehow missing from point blank range after Jevdjovic had yet again skinned his man.

Barbosa picked up PoM however Jevdjovic was the one who really caused problems and indeed completed 12 dribbles in the match, his finishing was woeful given 3 reasonable chances in scoring positions but I’d much rather he look for a pass/cross than attempt to score (he is instructed to do so in his PIs).

As for Morton they rarely troubled us but I put that more down to individuals than anything else, my average player is worth £30m+ so there was always going to be a gulf in class. It has to be said that his deep defence on what I believe may be a counter tactic stifled much of my attacking play and indeed Leroy Sane has a very quiet game and was hooked at half time having only made 1 dribble and offering very little. We struggled to create and had a number of crosses intercepted.

Morton’s full backs were by far their biggest threat to my formation and it was interesting to see how when their striker comes deep, the two inside forwards would tuck in to create space for the full backs as they’d sometimes drag my full backs inside with them.

If I were to play against Chris or a similar system in the future I would definitely worry about how gung-ho my full backs are and may even suggest switching them to defend duties and to sit wider to counter the threat posed by the opposition full backs.

If he were to play me again all I can think of is that he hope Jevdjovic has a little niggle and fails to make the squad.

Analysing Altrincham: The Wing Backs

Ahhh, much better to jump in with a post after a few days rather than weeks! You join me on my quest to turn an old tactical idea into a functional tactical reality – the catch being I’m managing Altrincham who are relegation fodder in the Vanarama Conference. After putting the finishing touches to the basic 4-1DM-3-2 outline, my initial idea was to provide a broad analysis of the tactic in action with pointers as to what is working and what isn’t. However after reading several articles recently that champion the merits of breaking down the tactic into its constituent parts, I felt it would be a nice idea to write a series of posts about each position and the issues I found. First up: The Wing Backs.
Continue reading